The ugliest tool in the shop

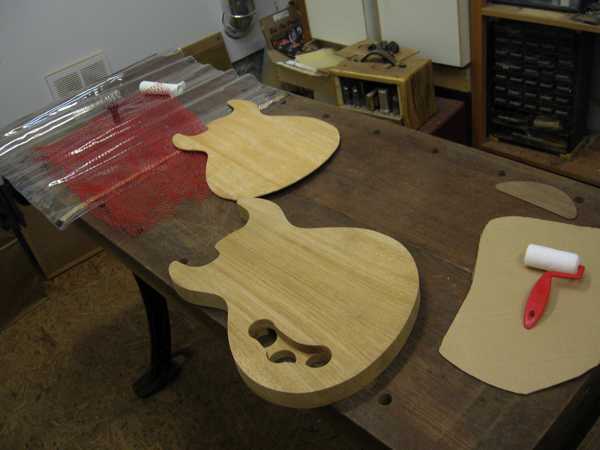
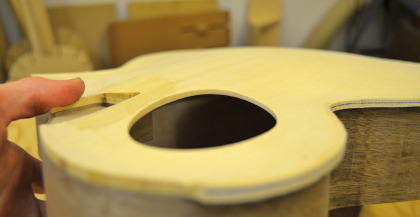
The tops (and sometimes backs) of my archtop guitars are carved by hand out of thick slabs of solid wood. While the shape on the ouside is important, what about the inside? It has to be smooth like the outside, but has to be precisely the right thickness, tapering thinner towards the edges.

How do I get them so thin without carving away too much? I know many luthiers use precision-machined deep-throated calipers, perhaps even with a digital readout. There exist also sets of carefully calibrated magnets that measure using their attractive force. But I use this, probably the ugliest tool in the shop:

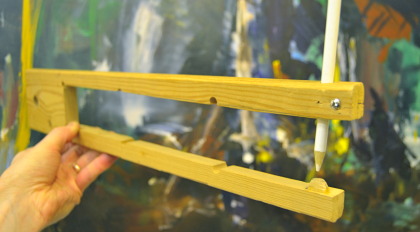
It's a piece of scrap wood (from a trashed ikea chair, no less), with a knob of wood glued to one arm and a pencil jammed in the other. It's a very simpe machine. And yet, it has proven to be perfect for the job at hand; simply set the pencil (white in this case for drawing on walnut; a soft artist's pencil for light woods) the desired distance from the knob and draw it across the plate like this:

Wherever the wood is thicker than the gap, the pencil leaves a mark. The arms have a bit of spring to them, so I can tell how much thicker by observing how faint or dark the pencil marks are. Then I simply plane away a few shavings and test again. By adusting the gap and looking at the pencil marks, I can also carve the plate thinner toward the edges.

It's extremely precise, it marks and measures at the same time, and it's basically free. I've been using it for sixteen years and ten archtop guitars- and only replaced the pencil once. Ugly or not, it's one of my favourite tools.

Spirit Varnish, part 2

Now for an update of my attempt to recreate Lorenz Mizler's spirit varnish:

After being added to ethanol, the raw lumps of resin quickly turn white and make the solution turn cloudy. Applying daily gentle agitation, the resin appeared to be slowly dissolving, forming a milky-straw coloured, creamy-consistencied mix.  After about two weeks, progress had stopped. I attempted to filter out the foreign material using a linen cloth. A lot of the resin lumps were still there, albeit of a soft, sticky consistency. Perhaps the saturation limit of the solution is lower for Brazilian copal than for shellac. I added ethanol to the top of the filter apparatus to see if I could get more varnish to flow through the filter. It worked a bit, but I was now left with a much more dilute solution, and it was still very cloudy.

In shellac, cloudiness indicates the presence of wax. In raw shellac there's a lot of it- maybe 20%. It's not really soluble in ethanol (I believe the term is that it forms a colloidal dispersion), but you can paint with it anyway because when dry it becomes fairly transparent. The wax makes the finish film less durable, however, and often less clear, so for fine work it is generally removed by letting it settle to the bottom of the jar and decanting the clear solution on top.

Perhaps I should try this? After all, Mizler's instructions did not say to agitate the solution, just to let it sit for a while. D'Oh!

Sure enough, after two more weeks the cloudiness in the dilute, semi-filtered solution had settled on the bottom of the jar. I decanted the clear solution into a small jar. Then just for the sake of curiosity I ran the thick whitish goop from the bottom of the jar through a coffee filter, and obtained yet more clear varnish (after all that waiting I didn't want to waste anything).  Success!

The solution is a lovely clear, canary yellow colour, but very dilute and fluid. I tried applying some to a piece of curly maple with the recommended soft brush. It appears to be very clear and gives good depth to the apprance of the wood, but too thin. Unless I can make a stronger solution this is not going to be suitable as a guitar finish- it'll just take too long to build up.

Next step- I'm going to try crushing the resin chunks to encourage thorough dissolving. I'll also leave it untouched for longer and decant first before attempting to filter. It'll be a while...

Best fretting program Ever!

I have been asked many times: How do you get the frets in the right place? Well, guesswork isn't good enough. There's a simple algorithm to figure it out though: take your string length, divide it by the twelfth root of 2, subtract that from the original length. Then repeat twenty more times or so...

The biggest problem (aside from tedium-induced narcolepsy cause by all that calculating) is actually in transferring those numbers to the physical fretboard without errors: they're cumulative, and the measurements can go off course in a hurry. My favourite solution was to print out a simple template generated by Jon Tirone's free program wfret. It prints out lines with the correct spacing, no cumulative error, and you just tape it to the side of the fretboard to know exactly where to cut the fret slots. It gets cumbersome when I'm making a guitar with different scale lengths on different strings (a "multiscale" instrument), but worse, it only works on windows.

Then just yesterday I found this: Aaron Spike's FretFind2D

Web-based (java), so it's free and works on any system (within reason), it creates a full representation of the fretboard, all the way to the bridge if needed. I can make a template of a regular or multiscale guitar, with as many strings as I want, I can specify the string spacing at nut and bridge, fretboard overhang (independantly at nut and bridge), I can even specify Just Tuning or Equal Temperament. And when I'm done I can print it out as a full-size PDF split appropriately across multiple pages; or as a DXF if I had a plotter. Oh yeah, and it's so easy to use I had it figured out pretty much instantly. Crazy Awesome.

New tricks

One thing is for sure when you are a craftsman- you can never stop learning. For me that's a big part of the fun: learning new techniques or processes to create new forms, or simply to streamline production. Vacuum-press gluing isn't exactly a new invention, but it sure is new for me. Using the inexpensive RoaRockit kit (originally made for skateboards, but usefull for all sorts of stuff), I'm able to do a better job laminating multi-layer guitar bodies.

I start with a core of lightweight butternut wood, fully cut and sanded to the final ouline, and with control cavity cut out. On the front and back will be applied "skins" of 1/8" thick birdseye maple.

What I didn't get a picture of are two more layers. In between the core and skins are sheets of heavy, acid-free black paper. They absorb excess glue to become hard and fuzz-free. When finished they'll show up as thin black lines around the edges of the instrument. In this shot I'm applying epoxy resin with a disposable roller.

You've got to work fairly quickly. This epoxy is supposed to start to harden in about 15 minutes, but it happens faster than that if left in the mixing pot. I've taped the parts together with masking tape to ensure alignment. Into the bag it goes:

The bag gets sealed with a very gummy tape, and then I pump the air out. By removing air from the bag, atmospheric pressure squeezes the parts together evenly on all sides, making a very consistent glue joint beween layers.

The red netting ensures that air can travel around the object being glued so it can reach the pump.That little pump and valve system was originally developed to remove oxygen from wine bottles for storage- seems like less trouble to just finish the bottle, if you ask me.

 And here's a sneak peek at the result: