
The first thing I was taught about woodworking was how to sharpen a knife. At 7 years old, I just wanted to make a wooden boat, a plane, a toy sword, and I wanted to do it Right Now! To my disappointment, my dad gave me a small knife, a demonstration of how to sharpen it, and the admonishment that until it was sharp, really sharp, I wasn't making anything at all.
I'm not alone. Although I didn't realize it at the time, this is the same treatment given to beginner apprentices the world over, from medieval europe to Japan, since time immemorial. Sharpen the masters' tools for a few years, and maybe one day he will deign to let you cut wood. It is as true as it has always been that the quality of a craftsmans' work is only as good as the quality of his edge.
I got to be pretty good. I had been using modern synthetic Japanese waterstones, which make short work of even the hardest steel, and can be persuaded to leave an excellent edge. But they need to be soaked in water and routinely need to be flattened as they wear, so they're a bit messy. Worse though was inconsistency- sometimes I could get a great edge, sometimes I couldn't no matter what I did. This was an issue of my technique. You can't buy your way out of it. So when I stumbled across these pages by Brent Beach I could see a better way.
Finally someone had taken a rigorous scientific look at what actually takes place at the edge when sharpening woodworking hand tools. In a craft driven largely by adherance to tradition, or else by "persuasion by anectodote", it was long overdue, especially in light of the great advances in materials technology that was beginning to filter down to artisan-scale and amateur woodworkers. Chisel blades can be made of exotic pressure-sintered alloys that stay sharp 10 times longer; abrasives have become so advanced it's hard to believe that I used to simply rub a piece of steel against a fancy rock. In my workshop, the stone age is (almost) over.
So here's my setup that I use for plane and chisel blades (knives and gouges are still in the neolithisphere):

I use an inexpensive 12"x 18" granite surfacing plate as my substrate. Even though it's only B (workshop) grade, it's extremely flat and precise by woodworking standards. Instead of sharpening stones, I apply adhesive-backed diamond abrasive film in four grits. These are light-years beyond anything else out there- the diamonds cut through any steel (and even tungsten carbide) quickly, the mylar backing film is accurate and tough but ever-so-slightly resilient, and the particle sizes are incredibly fine and closely graded.
Drawing fron Beach's research, I know that it is important to maintain very consistent angles while honing the edge. This simple jig sets the projection of the blade while it's in the blade holder:

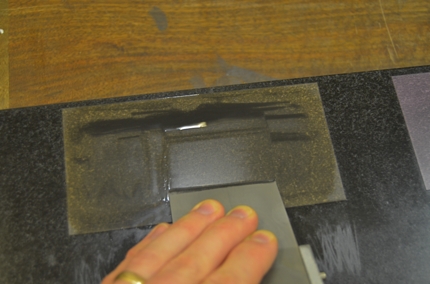
This blade holder is rather short; because I don't want it to ride onto the abrasive sheet (which would change the angle and possibly damage the sheet) I attached them sideways. This keeps the roller of the holder clearly on the granite surface. To carry away the swarf (that's the term for the fine powder of metal that comes from abrading the blade) and keep the abrasive from clogging I simply use unscented baby oil. It's also viscous enough that I can tell the condition of my edge by looking at the trail left by the blade:
Probably the key point of Beach's research is the importance of creating a microbevel on the back of a plane blade after honing the front. Only by doing so is one able to completely remove the worn-down edge and create a truly sharp blade. I found that the back side of my blade holder was just high enough to create a perfect 1.5 degree back bevel:

That's just the first step, the 15-micron sheet, referring to the size of the diamond particles (0.015mm). After that I reset the blade in the holder to obtain a 2-degree-higher front bevel angle (and thus a very slightly higher back-bevel angle) and hit the 3-micron abrasive. Following another blade projection adjustment is the 0.5 micron abrasive, and finally one last blade adjustment and 0.1 micron abrasive film (just for perspective, that's smaller than the wavelength of visible light!). If the blade edge is good and just needs to be sharper, I would skip the 15 and start directly on the 3-micron. Chisels get a similar treatment, though they are polished flat on the back rather than beveled.
It might seem a little laborious, but in fact takes very little time. The diamonds cut so fast, and because of the multi-bevel nature of the system very little metal has to be removed, so if a blade is in good shape it only takes 5 or 10 strokes on each sheet. The oil can be wiped up with a rag and the stone simply covered to keep out dust, and there's no fear of hidden water droplets causing rust on my tools. I don't have to flatten my stones- when the abrasive films wear out, it's a simple matter to peel one off and apply a new one. Of course, all this wouldn't matter if I didn't get good results. I'm very pleased with them, but you can judge for yourself:
